“I can’t afford an exercise program.” Have you ever thought that?
The effects of weakness and immobility are actually much more expensive than the financial and time costs of regular activity.
In other words, You can’t afford NOT to exercise.
The physical, emotional, cognitive and social benefits of exercise are well documented.
Being functionally fit is an investment in yourself that greatly impacts not only your quality of life but also your financial future.
Loss of strength and mobility are a leading cause of falls.
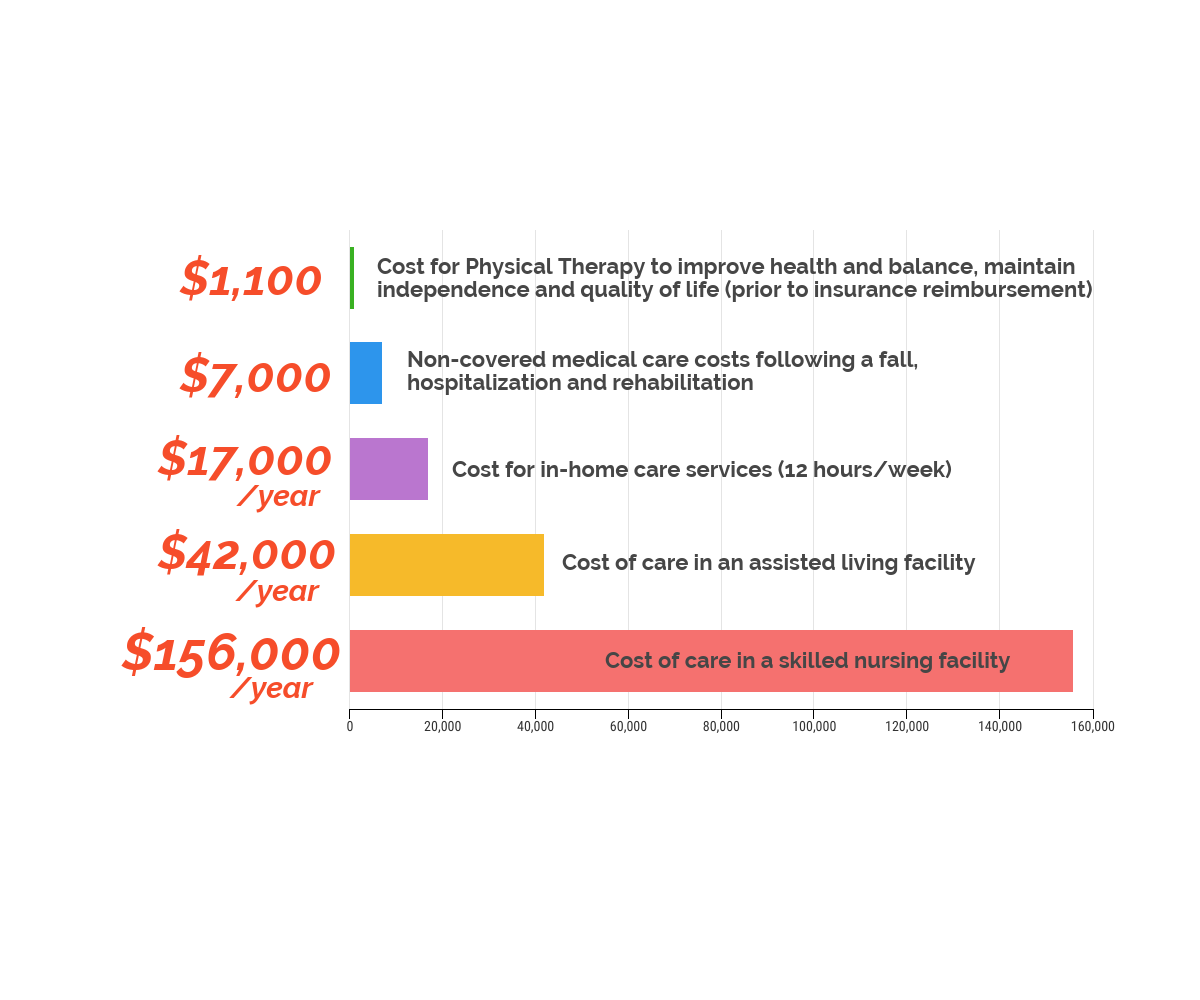
Falls without serious injury cost $3500 annually per person and non-covered medical care costs following a fall with hospitalization and rehabilitation are $7000.
If injury or weakness requires hiring help to maintain independence, costs rise dramatically. 12 hours of in-home help typically costs $17,000 a year, while full time residence in a skilled nursing facility are around $156,000.
Fortunately, the need for such expenses can be prevented or delayed.
Physical Therapy Compared to Costs of Falls and Increasing Levels of Care
Strength, Flexibility, Balance and Reaction Time are considered the most readily modifiable risk factors for falls.
A physical therapist is qualified to assess YOUR UNIQUE FALL RISK and tailor an exercise program to address YOUR problems so that when you are putting time in, it is truly making a difference in YOUR strength, balance and mobility.
So how much time are we talking about?
The National Council on Aging recommends 2 hours a week for strength and balance training to affect change. That time does not have to be done sequentially; it can be done in 10-15 minute increments throughout the whole week.
Together, we can come up with a plan that is fun as well as cost and time effective so you can keep doing the things YOU want to do.
Give us a call to schedule a free 20 minute Discovery Session so you can learn YOUR Balance Score and how you can improve it.
Falls happen backwards for a variety of reasons, including stiff, weak ankles as mentioned in the previous post. But another reason is that older legs are out of practice stepping backwards.
Every day we walk forward, so if we start to fall in that direction, our body knows what to do: step or reach to try to catch ourselves.
But if there is a loss of balance backwards, the older adult typically has one of 2 reactions:
They freeze, immobilized briefly by indecision/anxiety/fear, and a painful Nestea plunge toward the floor follows.
Unfortunately the ground is less forgiving than water.
OR, they take a series of rapid, mini steps backwards, trying to stay ahead of their momentum, until they can’t.
Often a counter, wall, chair, or the floor is what finally stops the motion.
By practicing taking steps backwards, the body becomes familiar with the movement and is prepared to react to the same movement to prevent a fall.
Stand at the counter and practice taking a SINGLE step backwards, moving your weight onto the back foot and STOP.
Once that is smooth and easy, add leaning forward at the hips as you step back. Doing this quickly shifts weight forward, making it harder for the body to keep moving backwards toward a fall.
Video Transcript:
I’m going to show you how to safely practice stepping backwards.
Begin at a sturdy surface like the kitchen counter or a solid chair.
Have both hands on the surface.
Begin with just taking small steps backwards.
Move your weight onto the back foot as opposed to just moving your foot back. Actually step back onto it.
As this becomes more comfortable you can begin taking larger steps back.
Try to get your foot at least past the other foot.
Once that becomes comfortable, begin practicing leaning forward while you step backwards.
By doing this you’re shifting the center of gravity into the middle of your base of support, so you’re much more solid when you stop.
The whole idea is if you lose your balance backwards, to be able to take a single step, not several steps backwards.
As you get more comfortable, practice “sticking the landing.”
When we are standing and start to lean forward slightly, sensors in our ankles notice the small movement. They quickly correct the tilt by firing our calf muscle to pull us back into upright.
The same happens on the front of our shin if we tip backwards.
But the built in sensors around the ankles can’t work properly if the ankle is really rigid or if the muscles are too weak to react to balance changes.
Practicing going up on your toes and rocking back onto your heels improves the movement in your ankles while strengthening the muscles.
When you raise your heels, going up onto your toes, you should get taller. If the calf is really weak, the body will try to cheat by moving the knees forward, and not getting any taller.
Next, rock back onto your heels, lifting the front part of your foot off the ground.
Don’t worry about how high you can lift to begin with, just get your ankles moving. Go up on your toes for one minute before switching to lifting your toes off the floor.
Video Transcript:
I’m going to demonstrate how to safely practice going up on your toes and rocking back onto your heels.
Start at solid surface like the kitchen counter or a sturdy chair.
Begin with both hands on your surface and progress to just one.
When you go up onto your toes, lift your heels up off the floor growing taller.
Be careful not to go up onto your toes only by rocking
forward at the knees and not getting taller.
When you go up we want you to go up slowly and controlled.
Be on the big toes, not rolling out onto your
little toes.
Hold it there, then lower gently to the ground.
When you go back on to your heels you’re going to lift the front of your toes up off the floor.
You won’t have as much range as you do going up on your
toes, but lift your toes as high as you can.
Hold it there and lower gently back down to the floor.
Each time we step, we have to rapidly switch our weight from one side to the other while lifting the other foot. We have to do the same motion when we step onto a curb, but have to hold it a bit longer.
It requires strength and balance to stand on one leg briefly, but also coordination to time moving side to side, lifting our leg, and planting the foot.
As we age, we tend to slow down and rapid movements become more difficult. Practicing moving from one foot to another improves coordination and reaction time.
If and when you need to rapidly get your foot onto the ground, like during a stumble forward, you’ve practiced it and your body will know what to do.
Start by tapping the base of the cabinet for one minute. Once that is smooth and easy, move to tapping your foot onto something 3” or higher.
Video Transcript:
I’m going to show you how to safely practice alternating toe-tapping.
As always begin at a sturdy surface such as the kitchen counter or a solid chair.
You can have two hands or one depending on your comfort level.
Begin by simply tapping your toes against the base of your kitchen cabinets.
Once that becomes easy and smooth, you can place your feet on top of a solid surface.
We increase the difficulty of this by either moving to a slightly higher surface or trying to go a little bit faster.
I’m proud of you for working to improve your balance.
Welcome to Part II of our series about improving your balance: Standing with the heel of one foot touching the great toe of the other foot, also called Tandem Stance
I know outside of the Olympics no one walks on a balance beam.
But most people do walk with their feet in a nearly straight line and heels almost touching as one foot is brought forward past the other.
Walking with our feet close together, or standing that way, requires our ankles to constantly be making small adjustments to keep us centered over our feet.
Think of how much harder it is to balance on a bicycle, with wheels in a line, than a tricycle with wheels far apart.
Our bodies are designed to detect movement between body parts, and their relative position to each other. This is called proprioception. Proprioception is how our feet and ankles sense we are leaning forward, even before our eyes notice the wall is now slightly closer to our face.
Standing in Tandem Stance works on proprioception in the ankles, retraining the brain to pay attention to small movements, and react to them.
And when you train your brain to react to small changes, it knows what to do if the ankles sense you starting to lean one way or the other.
Practice standing with each foot in the back for 1 minute each.
Watch the Video below to see me perform the exercise.
Video Transcript:
I’m going to show you how to safely practice standing with one foot directly in front of the other.
As always begin with a solid surface, like the kitchen counter or a sturdy chair.
You can have both hands or just one for support.
Place one foot directly in front of the other such that the heel of the front foot is touching the big toe of the back foot.
Once in position you can decide if you want more of your weight on the back foot or on the front foot, or somewhere in between.
But no matter where your weight is distributed you’re going to feel your ankles working hard to keep you upright.
Switch feet and have the other foot in the front and keep track of which foot is easier to have in the front or the back.
As in the previous exercise most people find they aren’t even.
I’m proud of you for working to improve your balance.